Python + React Quickstart
Get up and running with Swaps in an instant with Python and React
Overview
In this Quickstart guide, we will implement core swap functionality using the Swaps API, but to a limited degree; only with the ability to swap SOL on Solana to ETH on Ethereum Mainnet. Two endpoints are all we need - Get Swap Quote and Execute a Swap.
We will be using Python on our backend and React on our frontend.
Whether you are a beginner or a seasoned expert, this guide will take you through all of the necessary steps to have you swapping cryptocurrency cross-chain in no time.
What you will accomplish
In this tutorial, you will:
- Configure a Swaps widget in your local environment
- Build a front end widget for Swaps using React
- Build a back end to power your front end widget using Python, and our API endpoints:
- Get swap quote
- Execute a swap
- Display the functional widget locally in your browser
Prerequisites
Before beginning, you will need:
- A Swaps.xyz account: If you do not have one, contact us.
- An IDE (coding software): Some popular ones are Visual Studio Code and IntelliJ WebStorm. We will be using Visual Studio Code in this tutorial.
- A web browser: Any web browser will work. We will be using Google Chrome in this tutorial.
Implementation
Step 1: Define a file structure
We will be working with a React frontend and a Python backend. This will require an organized file structure. Let's define one below:
Swaps/
├── swaps-be/           ← Flask backend
│   └── swaps.py
├── swaps-fe/           ← React frontend (Vite)
│   └── src/
│       └── SwapWidget.jsx
│       └── App.jsx
Let's take this opportunity to create our Swaps root folder.
Step 2: Set up a file for your backend
Let's name this backend file swaps.py, and put it into our folder named swaps-be.
We will be importing a couple of libraries in Python to help us in our implementation:
flask, to help us with managing our backend <-> frontend connectionrequests, to help us with making REST API requests
To install flask:
pip install flask flask-cors requestsTo install requests:
python3 -m pip install requestsSpecifically, we will be using Flask, request, flask-cors and jsonify from the top-level flask library.
Flask: Creates your Flask app (app = Flask(**name**))request: Lets you access incoming data from frontend requests (request.json,request.args, etc.)flask-cors: Enables your backend to accept requests from different origins (like a frontend running on a different port), avoiding CORS errors in the browserjsonify: Included inflask. Turns Python dictionaries into JSON responses for your frontend
There may be some confusion between request from flask vs the requests library. While request allows you to read data from incoming HTTP requests sent to your Flask app (usually from your frontend), requests allows you to send outbound HTTP requests to other APIs (like Swaps.xyz) and handle their responses.
Step 3: Set up your frontend files in React
Make sure you are back in your Swaps root folder, with a subfolder named swaps-fe and create your React app like so:
npm create vite@latest swaps-fe --template react
cd swaps-fe
npm install
Within your empty swaps-fe folder, this command will create a set of more subfolders that looks like this:
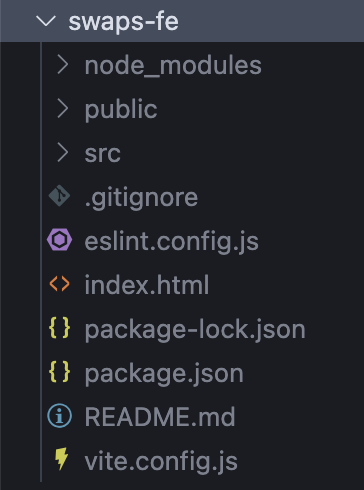
Next, add a folder called SwapWidget.jsx under src.
And then replace your src/App.jsx file contents with the following so as to change your entrypoint to SwapWidget.jsx - this will ensure that the only thing rendered is Swaps.
import React from 'react'
import SwapWidget from './SwapWidget'

function App() {
  return <SwapWidget />
}

export default App
Step 4: Populate your backend swaps.py file with code
swaps.py file with codeOur Python backend will run on the following code:
from flask import Flask, request, jsonify
import requests
from flask_cors import CORS

app = Flask(__name__)
CORS(app)

SWAPS_API_BASE = "https://api.swaps.xyz/v1"
HEADERS = {
    "accept": "application/json",
    "content-type": "application/json",
    "x-pk-key": "YOUR_PUBLIC_KEY", # DO NOT HARDCODE YOUR KEYS IN PRODUCTION. USE a .env file!!!
    "x-sk-key": "YOUR_SECRET_KEY" # DO NOT HARDCODE YOUR KEYS IN PRODUCTION. USE a .env file!!!
}

# Required fields for GET SWAP QUOTE
REQUIRED_QUOTE_FIELDS = [
    "fromCurrency",
    "fromNetwork",
    "fromWalletAddress",
    "fromAmount",
    "toCurrency",
    "toNetwork",
    "flow"
]

# Required fields for EXECUTE A SWAP
REQUIRED_EXECUTE_FIELDS = [
    "signature",
    "refundWalletAddress",
    "toWalletAddress"
]

@app.route("/quote", methods=["POST"])
def get_quote():
    data = request.json

    # Validate required fields
    missing = [field for field in REQUIRED_QUOTE_FIELDS if field not in data]
    if missing:
        return jsonify({"error": f"Missing required fields: {', '.join(missing)}"}), 400

    # Debugging
    print("Payload to Swaps.xyz:", data)

    try:
        response = requests.post(
            f"{SWAPS_API_BASE}/swap/quote",
            headers=HEADERS,
            json=data
        )
        response.raise_for_status()
        return jsonify(response.json()), response.status_code
    except requests.exceptions.HTTPError as err:
        print("Swaps.xyz returned an error:", response.text)
        return jsonify({"error": response.text}), response.status_code
    except Exception as e:
        return jsonify({"error": str(e)}), 500

@app.route("/execute", methods=["POST"])
def execute_swap():
    data = request.json

    # Validate
    missing = [field for field in REQUIRED_EXECUTE_FIELDS if field not in data]
    if missing:
        return jsonify({"error": f"Missing required fields: {', '.join(missing)}"}), 400

    try:
        response = requests.post(
            f"{SWAPS_API_BASE}/swap/execute",
            headers=HEADERS,
            json=data
        )
        return jsonify(response.json()), response.status_code
    except Exception as e:
        return jsonify({"error": str(e)}), 500

if __name__ == "__main__":
    app.run(debug=True, port=5001)
    print(app.url_map)
It is important to note that every request needs x-pk-key in the header; only Get Swap Quote and Execute a Swap need x-sk-key as well.
This backend will:
- ✅ Act as a lightweight proxy between your frontend and the Swaps API
- ✅ Validate that all required parameters are present before making upstream requests
- ✅ Call Swaps.xyz’s /swap/quote endpoint to retrieve a real-time swap quote in response to select frontend changes
- ✅ Call Swaps.xyz’s /swap/execute endpoint to initiate a swap using the quote’s signature when the "Swap" button is clicked on the frontend
- ✅ Forward Swaps responses (both quote and execution) directly to the frontend
- ✅ Return error messages in JSON if anything fails
- ✅ Log payloads and upstream responses for debugging/integration testing
- ✅ Enable CORS support so that our React frontend can interact with it safely
Step 5: Populate your frontend SwapWidget.jsx file with code
SwapWidget.jsx file with codeOur React frontend will run on the following code:
import React, { useState, useEffect } from "react";
import axios from "axios";

export default function SwapWidget() {
  const [formData, setFormData] = useState({
    fromCurrency: "sol",
    fromNetwork: "sol",
    fromWalletAddress: "",
    fromAmount: "",
    toCurrency: "eth",
    toNetwork: "eth",
    flow: "standard",
  });
  const [quote, setQuote] = useState(null);
  const [signature, setSignature] = useState(null);
  const [toWalletAddress, setToWalletAddress] = useState("");
  const [executionResult, setExecutionResult] = useState(null);

  useEffect(() => {
    if (formData.fromAmount && formData.fromWalletAddress) {
      const fetchQuote = async () => {
        try {
          const res = await axios.post("http://localhost:5001/quote", formData);
          setQuote(res.data);
          setSignature(res.data.signature);
        } catch (err) {
          console.error("Failed to fetch quote:", err);
        }
      };
      fetchQuote();
    }
  }, [formData.fromAmount, formData.fromWalletAddress]);

  const handleInputChange = (e) => {
    const { name, value } = e.target;
    console.log("Input changed:", name, value);
    setFormData({ ...formData, [name]: value });
  };

  const handleExecute = async () => {
    try {
      const res = await axios.post("http://localhost:5001/execute", {
        signature,
        refundWalletAddress: formData.fromWalletAddress,
        toWalletAddress,
      });
      setExecutionResult(res.data);
    } catch (err) {
      console.error("Failed to execute swap:", err);
    }
  };

  return (
    <div className="flex justify-center items-center min-h-screen">
      <div className="w-[400px] bg-white rounded-xl shadow-lg p-8 transform transition-all hover:shadow-xl">
        <h1 className="text-2xl font-semibold text-center mb-8">Swaps.xyz</h1>
        <div className="flex flex-col w-full items-center">
          <div className="w-[320px]">
            <input
              name="fromWalletAddress"
              placeholder="Your SOL Wallet Address"
              onChange={handleInputChange}
              className="w-full border p-2.5 rounded text-center mb-4"
            />
            <input
              name="fromAmount"
              placeholder="Amount of SOL to swap"
              onChange={handleInputChange}
              className="w-full border p-2.5 rounded text-center mb-4"
            />
            <div className="text-gray-500 text-center py-2 mb-4">↓ Swap to ↓</div>
            <input
              value={formData.toCurrency.toUpperCase() + " on " + formData.toNetwork.toUpperCase()}
              disabled
              className="w-full border p-2.5 rounded bg-gray-100 text-center font-medium mb-4"
            />
            {quote && (
              <p className="text-sm text-center text-green-700 mb-4">
                You will receive: <strong>{quote.toAmount} {quote.toCurrency.toUpperCase()}</strong>
              </p>
            )}
            <input
              placeholder="Your ETH Wallet Address"
              value={toWalletAddress}
              onChange={(e) => setToWalletAddress(e.target.value)}
              className="w-full border p-2.5 rounded text-center mb-4"
            />
            <button
              onClick={handleExecute}
              className="w-full bg-blue-600 text-white p-2.5 rounded hover:bg-blue-700"
            >
              Swap Now
            </button>
            {executionResult && (
              <div className="mt-4 p-3 border rounded bg-green-50 text-sm text-center">
                <p>Status: <strong>{executionResult.status}</strong></p>
                <p>Send your SOL to:</p>
                <p className="font-mono text-xs break-words text-gray-800">{executionResult.depositAddress}</p>
              </div>
            )}
          </div>
        </div>
      </div>
    </div>
  );
}
Aside from some work to make the page look a little bit better, this frontend will do a few things:
- ✅ Collect the user’s origin wallet address and amount for the swap
- ✅ Dynamically fetch a swap quote from your Flask backend (which calls Swaps.xyz) whenever the amount or wallet changes
- ✅ Display the real-time quote showing how much of the destination asset will be received (using standard rates)
- ✅ Collect the destination wallet address (i.e. ETH wallet for the user on another chain)
- ✅ Trigger the swap execution via your backend by passing the signed quote and destination address
- ✅ Display the deposit address where the user must send their funds to complete the swap
- ✅ Handle basic loading and error cases in the console for debugging
Step 6: Run your backend and frontend on localhost
Now that you have your code, it's time to run these files on localhost. We will be running our backend on Port 5001 and our frontend on Port 5173.
Running the backend
- Navigate to your backend folder
swaps-be
cd swaps-be- Run
swaps.pyonPort 5001(already specified in code) using this command
python swaps.pyNote: If that doesn't work, you may have python3 installed, in which case, use:
python3 swaps.pyRunning the frontend
- Open a separate terminal tab/window
- Navigate to your root directory (
Swaps/) and do
cd swaps-fe/src- Next, use
npmto run the frontend onPort 5173
npm run devNote: you may need to install Node to get npm working, if you haven't already. You can download that from the NodeJS website right here.
Step 7: Testing the flow
Note: Swaps.xyz currently only supports production transactions, which means you will need to use real funds to test your flow.
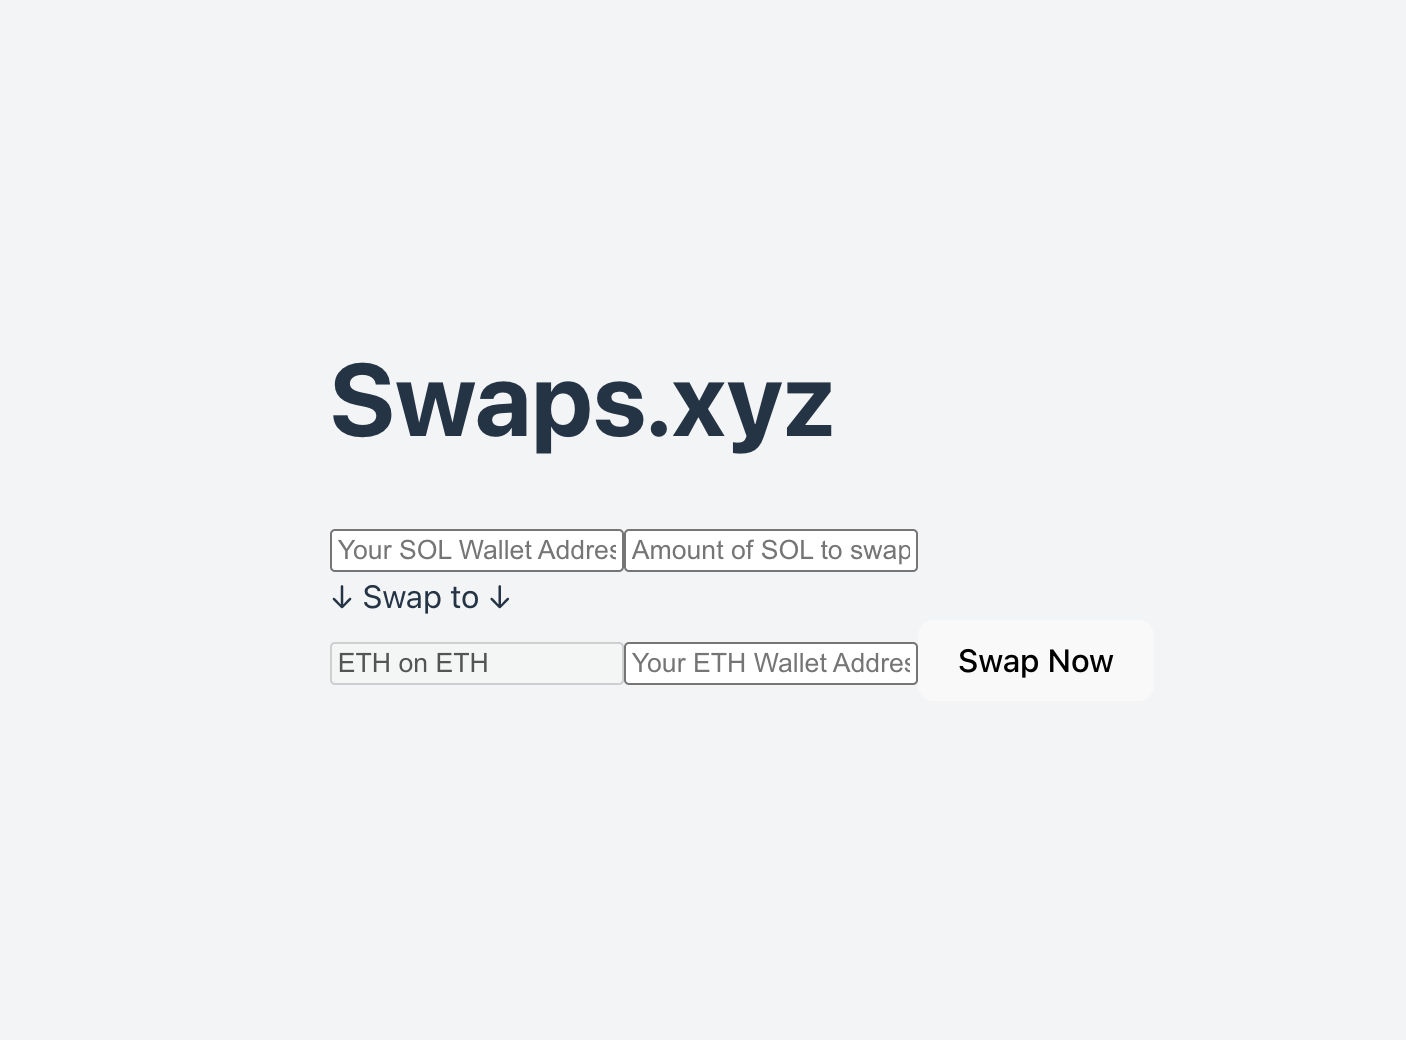
Let's test our simple Swaps integration. First, navigate to your frontend at http://localhost:5173/
You should see our modest Swaps tool, looking something like this:
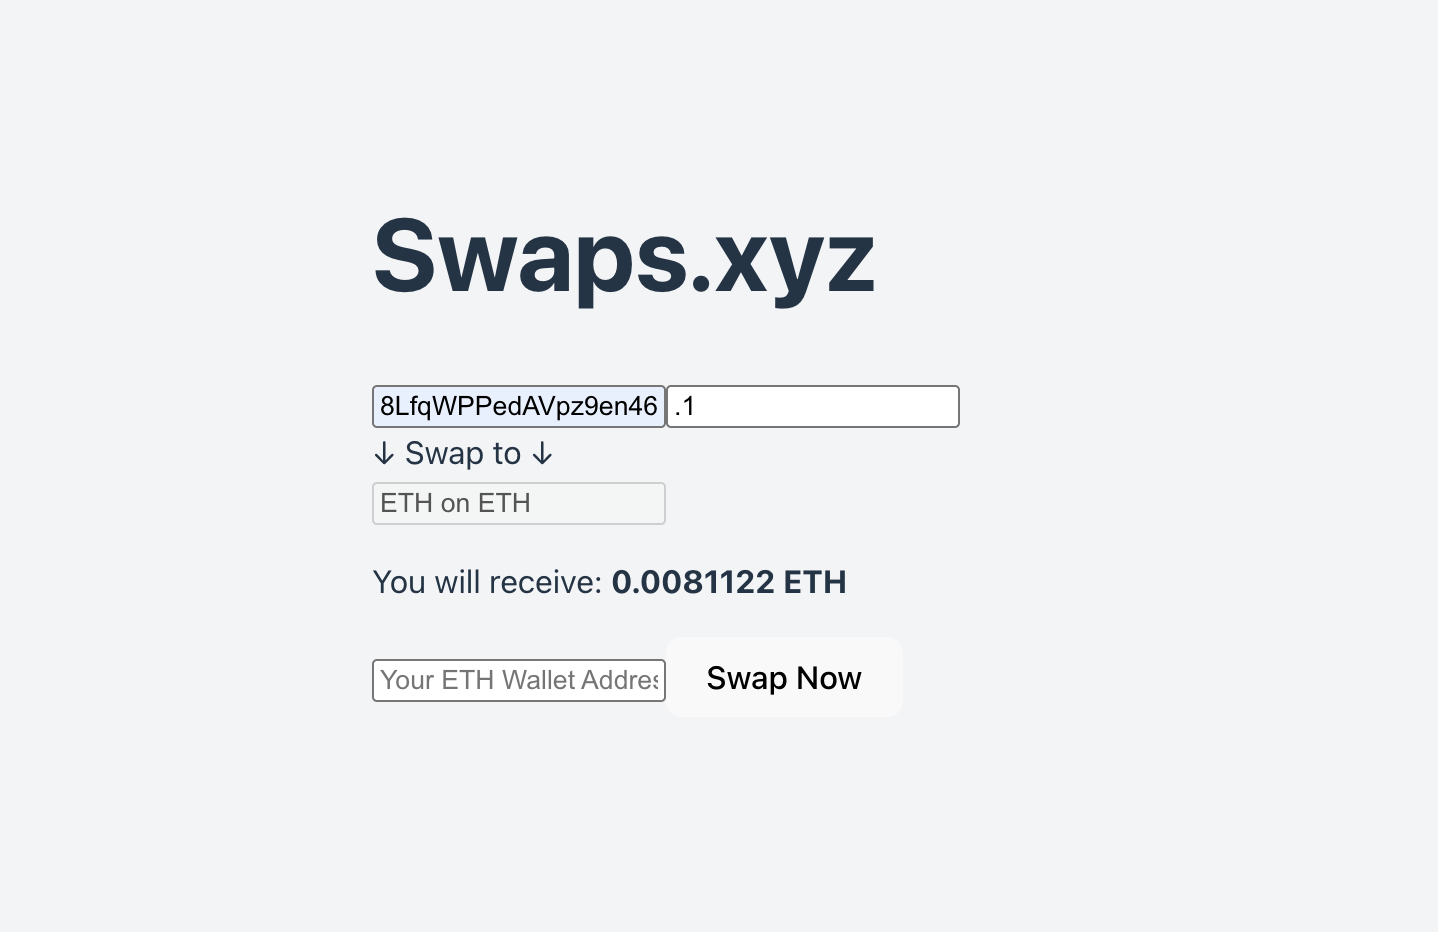
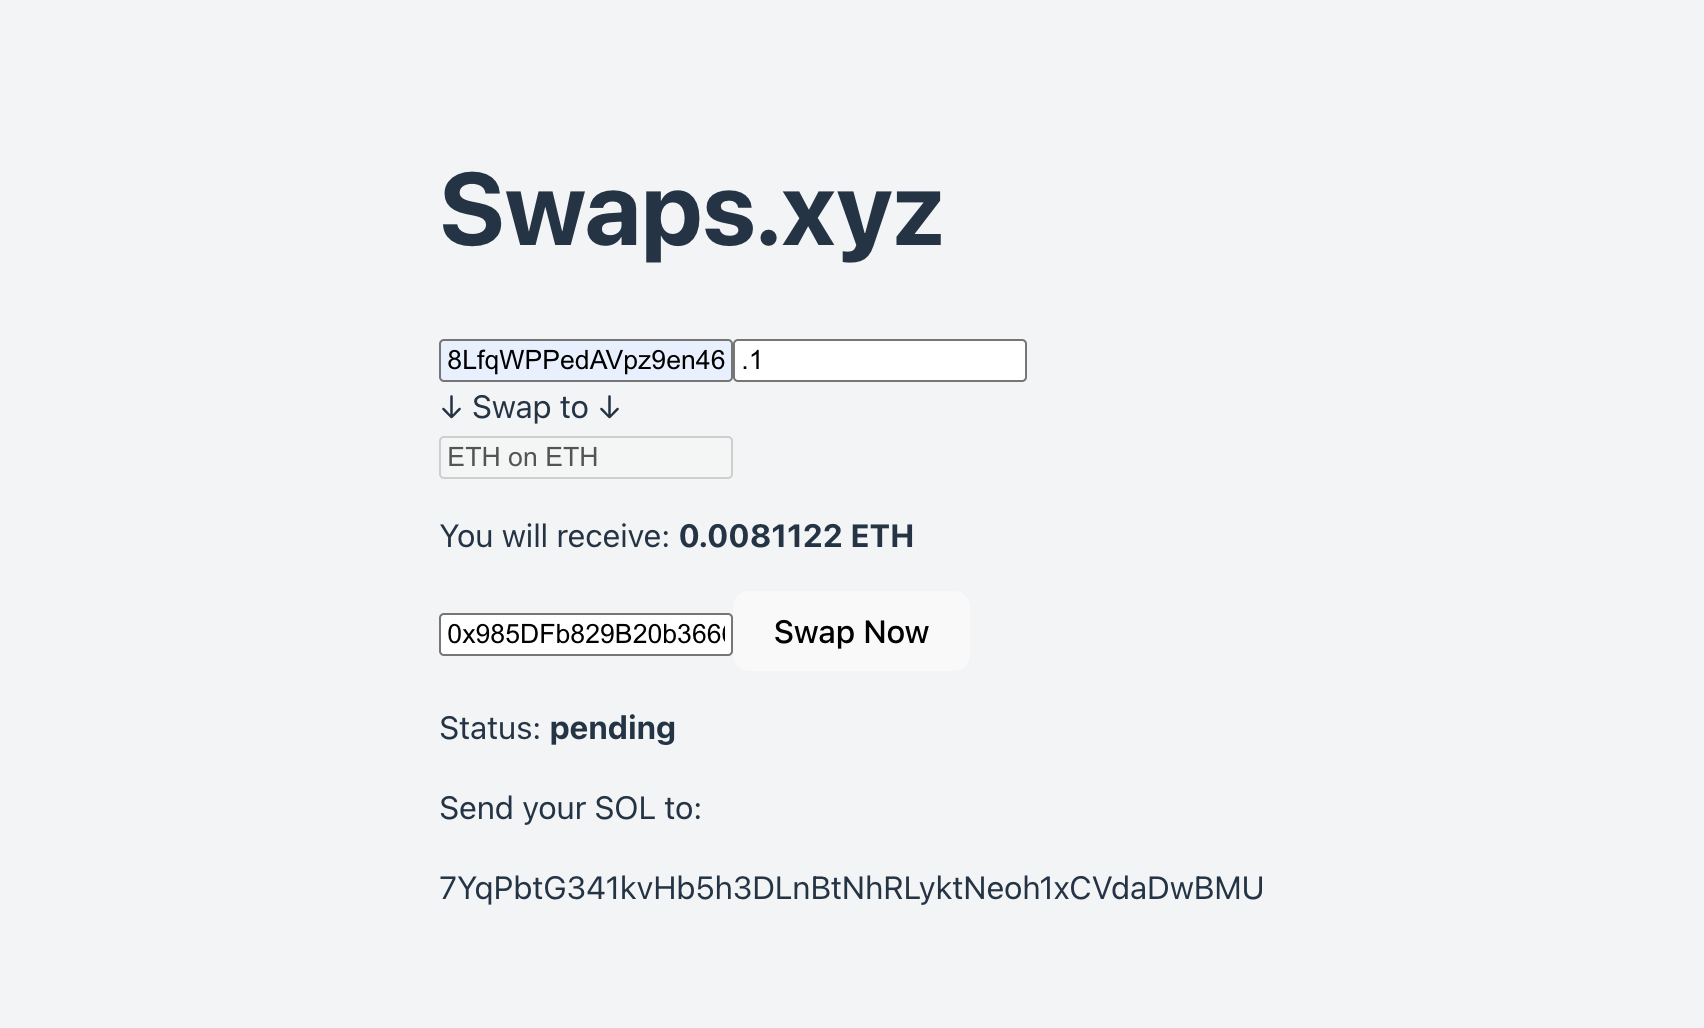
When we add our wallet address and some amount in SOL, we should see the UI update to reflect the amount we would receive in Mainnet ETH:
Let's add our Ethereum wallet address and click the "Swap Now" button. Once we do that, we should see this screen, which instructs us to send SOL to the deposit wallet address (response from the Execute endpoint):
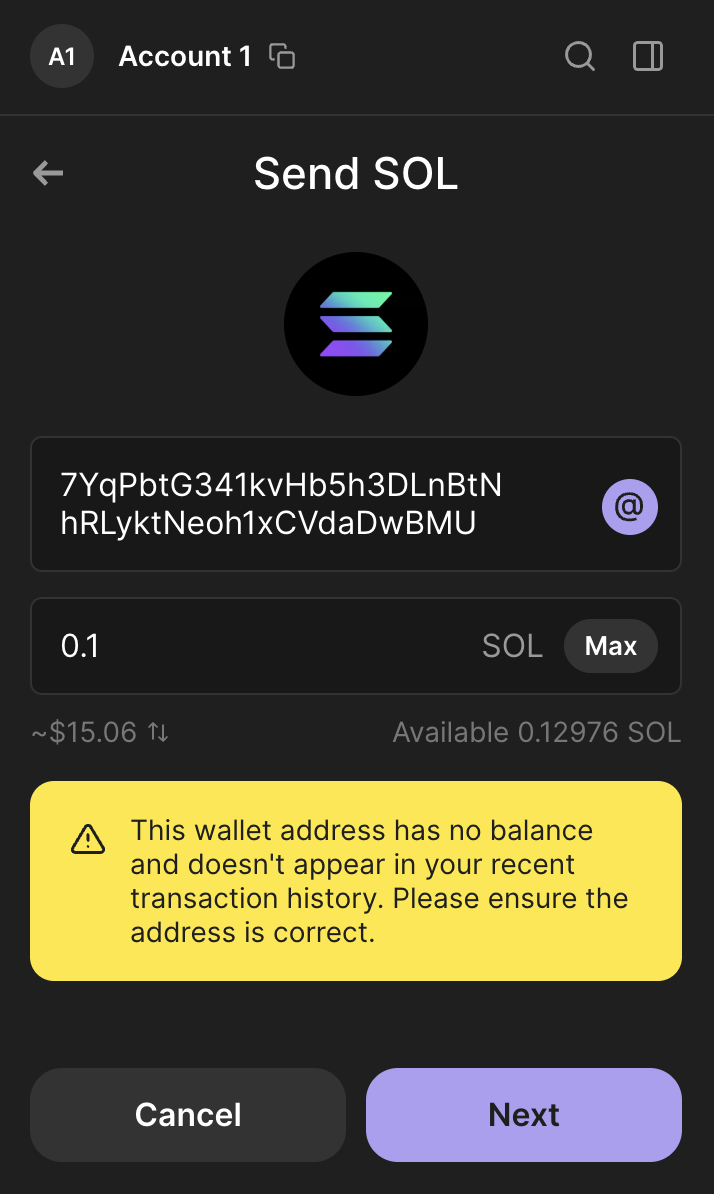
Let's send that SOL over to the deposit wallet address now:
Optional: While you wait, you may track your transaction by navigating to developer tools > Network > your Execute request > Response > transaction ID. You can copy that ID and hit the Get Swap Transaction with Status endpoint to track your transaction. On a full UX, this would be integrated into the frontend (see Best Practices section next).
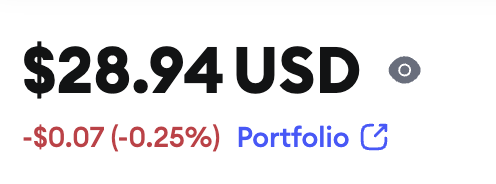
Once finished, you should see an updated balance in your Ethereum wallet!
Completion
Congratulations, you have just integrated the Swaps.xyz API using a Python backend and React frontend! 🎉
There are so many ways to integrate this set of APIs and create a fantastic crypto swapping experience for your users. If you want learn how to make the integration even better, have a look at our Best Practices section.
Any questions? Feel free to visit our Help Center to dig into our other resources, or drop us a line!